Whether you’re talking about LPs or MP3s, people have really different ideas about what constitutes “the ultimate music collection.” For some, it means a process of endless refinement, boiling down a set of music to the purest essentials: All signal, no noise. For others, it’s an archival process (“Why have one Bix Biederbeck CD when you could have 23?”)
It’s possible to have the best of both worlds: Maintain a large collection so you have access to everything, but create a playback system so you only end up hearing what you truly love.
I’ve been an eMusic subscriber for nearly a decade. I’ve spent a good deal of my spare time over the past four years digitizing my entire record collection, followed by my entire CD collection, followed by the large CD collections of six record-collecting friends (one of which alone was basically the Musical Library of Alexandria). All told, I’ve managed to amass a collection of ~120,000 tracks spanning ~9,100 albums, mostly in lossless format, and all with high-quality album art.
The accreted set now weighs around  2.25 terabytes  – large enough to have “special needs.” Over the past four years of building the collection, I’ve  picked up a few tips. Thought I’d share some of the most useful bits here,  in case anyone finds them helpful.
Love it or hate it, iTunes has enough traction to be considered the “default” music player for almost everyone, so I’m going on the assumption that it’s your player too. If you use something else, power to you! Everything below assumes you use iTunes 11 or 12.
This guide is split up into four major sections:
- Remote Control (Playback techniques)
- Miscellaneous iTunes Tips (Rare B-sides)
- Digitization Notes
- Building a Server
Remote Control (Playback)
Controlling Playback Locally
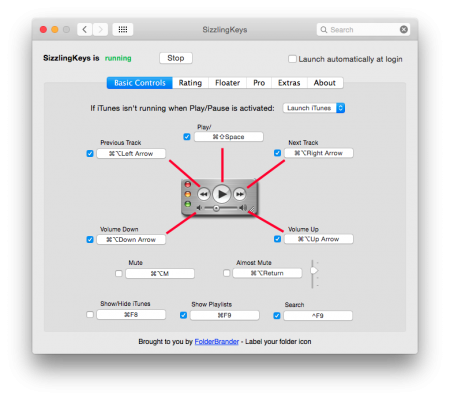
If you’re sitting at the helm of the server, make sure you can control playback easily without having to bring iTunes to the front every time. Most modern Mac keyboards have play/pause/skip keys built right into the keyboard, but for more fine-grained control, install Sizzling Keys, which also lets you do things like assigning star ratings, mute, show/hide playlists etc., all without bringing iTunes to the front.
 If you’re going to spend much time sitting at the same computer that functions as the server, don’t sell yourself short on output gear. Skip the typical computer speakers and invest in some high-quality studio monitors, attached through a good DAC. I personally love my Adams A5X speakers and Nuforce Microdac, but there are tons of options out there. The difference between a setup like that and a typical pair of analog speakers utilizing the computer’s built-in DAC is astounding. This is the best music you’ve ever collected, and the best music your friends have ever collected. Do it justice!
Controlling Playback from Another Mac in the House
Chances are, you’ve got multiple Macs, plus iPhones and iPads in the same house. With a single machine designated as “the server” (which holds all of the actual music, playlists etc.)Â you can control playback from any Mac to any set of AirPlay enabled speakers (which typically means an AirPort Express connected to your home stereo elsewhere in the house). There are two ways of doing this:
1) via iTunes Home Sharing
On the server, go to iTunes preferences and enable Home Sharing (you can choose to share the entire library or just certain playlists). Once set up, launch iTunes on any other Mac in the house (on the same subnet). Ignore any music that may be stored on that Mac and look instead for the little “Home” icon in the upper left:
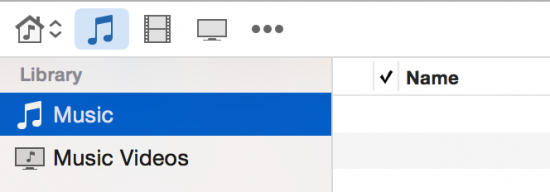
Click the home icon at top left…
Then select a library shared on the network.
Select that and pick a shared library to access. A few seconds later, all yr amazing tracks will come spilling out of the client Mac (the “client” is the computer currently accessing the services provided by the machine designated as the “server”). But wait – doesn’t this prevent you from listening to music on your living room hi-fi? Nope – you can still reroute audio to the AirPort Express, even from the client Mac (see Output Destinations).
This technique is probably the easiest, but one downside is that access is read-only – you can’t edit playlists, or rename / delete / rate tracks this way.
The other downside is that the client Mac has to download the entire music index from the server (not the music, just the index) before it can do anything. With a very large library, the index can take a while to load. This is a (partially) solvable problem! On the server, in iTunes sharing preferences, set it to share only selected playlists, not the entire library. If your library is 100,000 tracks and you share playlists consisting of 10,000 tracks, that’s still plenty, and you’ll improve the initial remote access time dramatically. You can change up the shared playlists from time to time.
If you don’t want to limit what’s shared and still want to keep initial access time fast, read on.
2) via Screen Sharing
This technique is a bit trickier to set up, and the interface can end up being a bit odd, but it gets around the two downsides just mentioned. When you access a music server via Screen Sharing, you are truly controlling the desktop of the server, so your access is read/write (you can edit playlists, delete tracks, etc.) And there is no need to load in the whole index before playback can begin.
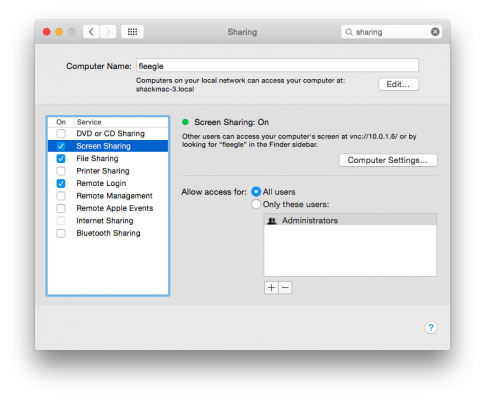
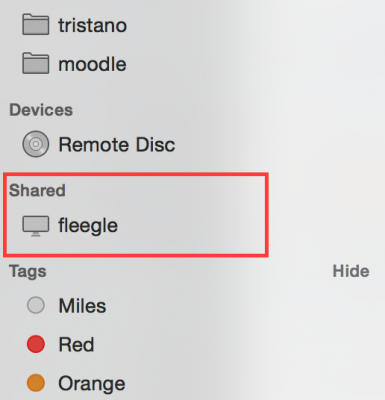
On the server Mac (let’s imagine its hostname is “fleegle”, go to System Preferences | Sharing and enable “Screen Sharing.” Set any permissions you like (e.g. password required?) and close the dialog.
On a client Mac on the same network, find “fleegle” in the Finder’s sidebar.
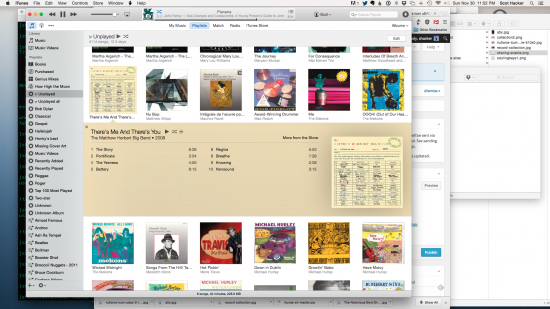
Then click “Share Screen” and enter credentials if needed. A few seconds later, you’ll have the entire desktop of the server Mac running in a window on the client Mac.
This can be a bit weird if the server’s screen resolution is larger than the screen of the client Mac – you’ll either see everything rendered small, or cut off (so that you need to scroll horizontally and vertically to see everything). To control this choice, use Screen Sharing’s “View” menu to turn “scaling” on or off.
Viewing/controlling the server Mac from a client Mac in the home via Screen Sharing.
If you don’t like Apple’s native Screen Sharing app, Â experiment with 3rd party VNC apps. I love JollysFastVNC, which has a groovy “elastic screen” mode to deal with desktops of differing resolutions.
Tip: In any view, hit Cmd-L to jump to the currently playing track. This is especially useful when in Album view, since the display doesn’t update itself to jump automatically to the current track like it does in song view.
Controlling Playback from an iPhone or iPad
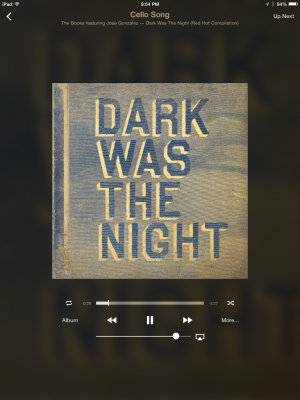
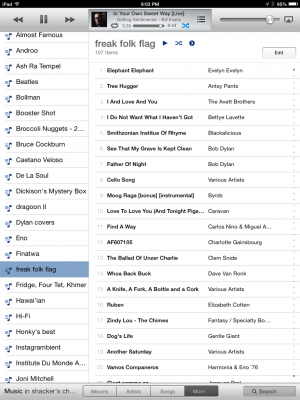
You may find controlling your server from around the home with an iPhone or iPad a more elegant solution. Apple offers the Remote app for iOS for just this purpose. Remote mostly works as advertised, though it can be a bit buggy at times. It’s a great way to really appreciate all the work you’ve put into embedding high-quality album art over the years – especially on a large-screen iPad.
Controlling a remote collection with the iOS Remote app.
Downside: Unlike your TV remote, which is always ready and responds instantly, using a phone for this purpose means that every time you want to skip a track or see an album cover you’ve got to unlock the device (assuming you have security enabled), find and launch the Remote app, and wait for it to connect. That can be a somewhat tedious process if you need to use it often. For example, pausing playback when the phone rings is probably going to take you 15 seconds or more – annoying. One possible solution would be to get an old iPhone or iPad to use as a dedicated remote, on which you can turn off security.
Controlling a remote collection with the iOS Remote app.
Output Destinations
If you’re using an Airport Express or any other AirPlay system, look for the AirPlay selector in iTunes:
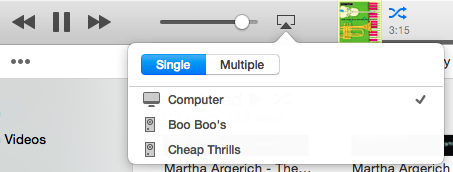
Use this to toggle between playing back music on the same computer or sending it to any AirPlay device in the house. Â Most of the time, mine is pooting forth tune-age to the home stereo across the house in the Living Room.
If you use a portable AirPlay-enabled speaker, you can use the same technique to send music to that device.
Accessing Your Music From Work
So how do you enjoy your collection living on a home server from work? You don’t want to be in the business of shuffling files back and forth, and no iPod in the world has enough capacity to store a very large collection. Besides, you want to define your playlists and preferences once, not multiple times in multiple locations. And you never want to risk the possibility of split collections diverging (music on one machine never making it over to the other).
iTunes Match – and the parallel offerings from Amazon and Google – sound like the perfect solution to this dilemma. They offer to scan your collection and provide cloud access to every track you own, uploading any have that aren’t already in their database. Unfortunately, iTunes Match is limited to a measly 25,000 tracks, while my collection is around 5x larger than that. Believe me, I’d love to throw my money at Apple to provide a Match service that would actually work, but it’s been years now with no indication of them ever bumping up the max size for Match collections. I’m not hopeful.
Fortunately,  you can listen to music stored on a computer at home from your desk at work. It just takes a bit of middleware and a small amount of effort. iTunes’ “Home Sharing” feature lets you share your collection with anyone in your own house, i.e. anyone on your same subnet (those sharing the same wifi router). But your computer at work can’t see your home subnet, and thus can’t find the collection being shared by your home music server.
There are a few ways to skin this cat, but the tool I found and love is called Slink. Install it on your home music server and it’ll give you a token. Email the token to yourself and then install Slink on your work computer and enter the same token. Bingo – your work computer can now see shared resources on your home network, including the shared music collection – and you can stream from home to work all day long for free.
The solution isn’t quite perfect because the access is read-only – you can’t edit a remote playlist or give tracks star ratings via Home Sharing. I’ve experimented with non-Slink techniques for accessing my home collection from work to get around that problem, but found them too complex and tedious to set up and maintain. Go with Slink.
Miscellaneous iTunes Tips
Consolidating Multi-Disc Albums
Prior to iTunes 11, a four-disc album would appear in Album view as four distinct units: “Moonunits – This Is My Jam [Disc 1]”, “Moonunits – This Is My Jam [Disc 2]”, “Moonunits – This Is My Jam [Disc 3]”, “Moonunits – This Is My Jam [Disc 4]”. For giant box sets this created a lot of clutter, and it’s also a lie – this view should be showing one entity per album, not per disc. As of iTunes 11, if the “Album Artist” and “Album Title” fields match across multiple discs, and you use the “Disc number x of y” field, the multiple discs will all appear as a single entity. “Moonunits – This Is My Jam”. Single-clicking that album reveals the various discs it contains.
I’ve used this feature extensively while building out the collection, and removed a ton of clutter from Album views as a result.
Viewing Full-Size Cover Art
So you’ve stored all of this gorgeous, high-res cover art to try and approximate the magic of the old-school LP experience. But how can you get iTunes to display it large?
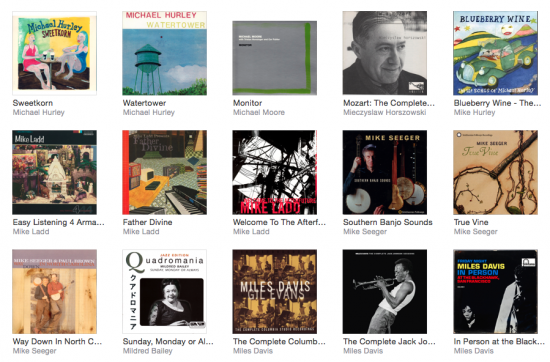
If you click the small thumbnail of the album cover in the main iTunes controller, the main iTunes window will be minimized and a small (300x300px) version of the cover art will be displayed. Annoyingly, you can’t make this window any larger. iTunes almost seems to be actively discouraging full-size art viewing!  But: If you instead hold down the Cmd key while clicking the artwork thumbnail, you’ll get a resizable window you can drag to a very large size. I like to make mine around 800px wide, then move it to a dedicated workspace that’s all about cover art.
Use Smart Playlists
Smart Playlists are insanely useful when trying to optimize a large collection. Because they’re query-based, they update themselves in real time as conditions in the collection change. Here are some of my favorites:
Unplayed
I use the Unplayed list to make sure I’ve heard everything in the collection at least once. For years, this has been my primary playlist.
I use this list during the digitization workflow so I can filter down the collection to just the albums that have been added in the past few days, or the past week or whatever needed. Remember, you can still search for a particular artist or album title from within smart playlist results!
Tip: When adding cover art, be sure to find candidate albums via your Recently Added list, not Unplayed. If you’ve accidentally or intentionally played a few tracks in an album recently, and then embed cover art in what shows up under Unplayed, you’ll end up with a few tracks in that album with missing cover art!
Missing Cover Art
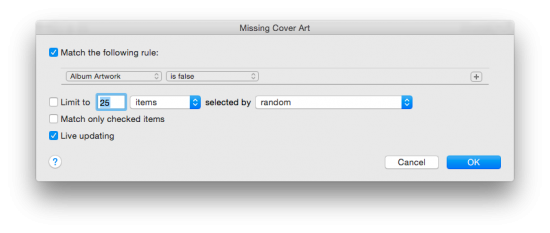
If even one track on an album has cover art, Album View will show the entire album as having artwork, even if it doesn’t. Helpful, but potentially misleading! This can happen accidentally in various ways. To query your whole collection for tracks with missing art, build a smart playlist like this one.
Low Bitrate
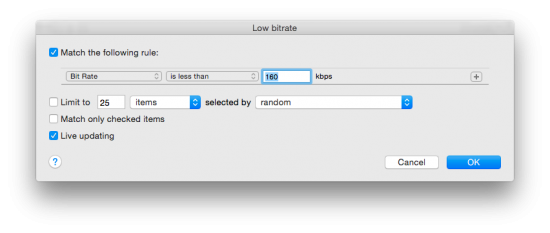
Even if your goal has been to make sure everything in your collection is stored lossless or at a high bitrate, it’s inevitable that you’ll have some old straggler files hanging out at the dreaded 128kbps, or even lower. Some of these you’ll want to keep for various reasons (e.g. you haven’t been able to locate higher resolution versions), while others should be considered candidates for deletion or replacement. I like to use this query as a starting point for finding replacements on eMusic or mp3.amazon.com.
Best tracks
I use this to keep track of everything that’s been rated with 4 or 5 stars. This becomes the pool from which I draw tracks to include on the annual New Year’s CD I give to friends.
Worst tracks
I use this to keep track of everything that’s been rated with 1 or 2 stars. These tracks are considered candidates for deletion (assuming you don’t necessarily want your collection to include music you’ll probably never want to hear) or for keeping but skipping (see Auto-Skipping Tracks).
How to Delete Actual Track Files from Within Lists
Both iPhoto and iTunes share this deletion pattern: If you’re currently looking at the master Photos or Music library, and you delete photos or tracks, you’ll be prompted to delete the actual track files from disc. But  photo albums and playlists store references to tracks and photos, not the tracks and photos themselves. Therefore, pressing Delete will prompt you to remove references from the current album or playlist, leaving the actual files on disc. If you really want to delete a track or album permanently while in the context of a playlist, hold down the Option key (Opt) when deleting. The dialog will then offer to remove the tracks both from the current list and from disc.
Unmark for Playback (Auto-Skipping)
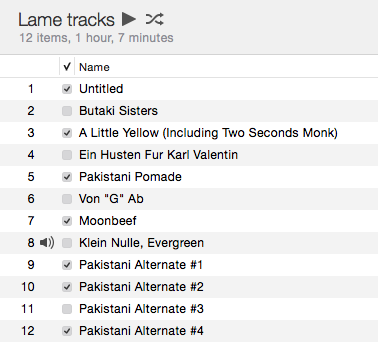
You’ve probably noticed the column of checkboxes on the left of the iTunes Song view:
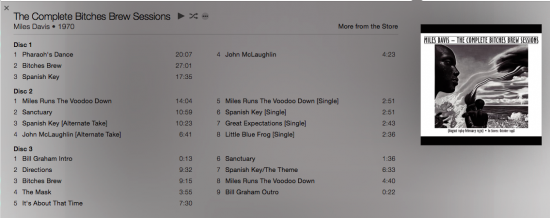
Most people have never actually touched this column, because its purpose is not obvious. Here’s the key: Whether a track is checked or not, it’ll play just fine when double-clicked. But if you’re playing a playlist, or are in shuffle mode, unchecked tracks will be skipped. This turns out to be super useful if you want to keep certain albums or tracks around for archival reasons but don’t want them coming up at random. For example, I dig free jazz explorers Peter Brotzmann and Sonny Sharrock, but don’t want them coming up when I’m trying to concentrate on code at work. Unchecking their albums prevents unexpected sonic booms while I’m trying to work.
If you’re ever on the fence about whether to delete an album, consider unchecking it instead. That way you’ll still have it but won’t be bugged by it  unexpectedly when it comes around on the jukebox.
Tip: You can check/uncheck a whole column of these at once by holding down the Cmd (Command)Â key while clicking the top box in a column.
Don’t Break Albums
As a collection grows, you’re going to end up with lots (LOTS!) of duplicate tracks. The same track may show up on the original album, on a remastered version created years later, and on various compilations. You may think you’re saving disk space by rooting out the duplicates (iTunes even has a tool for that built in) but it’s a fool’s errand. Going down this road will make you crazy, and it’s more important to keep albums intact so each can be played back the way it was intended to be.
The only duplicates you should consider deleting should be individual tracks that have been acquired independently of any album.
Genres Are Pointless
It’s good to be anal retentive about album titles, artist names, and track titles. And getting the right year into the metadata can help you create excellent Smart Playlists based on specific eras. But the one piece of metadata I consider pretty much pointless is the genre.
Albums come into your collection from various sources with completely nonsensical genres, and trying to puzzle through what single genre would make most sense for a given album is borderline offensive to so much of the world’s great music (“Let’s see, what single bucket shall I stuff you into, Captain Beefheart – avante garde, blues, or rock?” – it’s a silly question). In some cases the genre field can be helpful, but my advice is to ignore it completely.
Backup, Backup, Backup!
Having a collection in the multiple terabyte range raises an obvious question: How do you back it all up? One home burglary or disc failure could erase years of concentrated effort in minutes; not a risk worth taking.
Using Time Machine to back up a collection like this would require an additional multi-terabyte drive, and you’d still be susceptible to loss via fire/flood/theft.
The only viable solution is to use a cloud backup system like Backblaze, CrashPlan, or Carbonite (cloud backup systems reviewed). For Mac users, I recommend Backblaze, which seems to be the most elegant/unobtrusive. Set it and forget it.
Regardless what system you use, the initial backup to the cloud could take weeks or even months, and the process could slow down your system a bit during that time. After that, you won’t even feel it (you can also schedule it so it only runs in the middle of the night).
Don’t Fear the Shuffle
With a library of 120,000 tracks, you’re talking about a full year of continuous, non-repeating playback — if you could listen 24/7. More realistically, you’ll hear probably four hours per day, so make that six years of continuous playback. And that’s if you never add any new music.
Some people think of shuffle as a dirty word – disrespectful to the artists and engineers who carefully crafted the track orders of all those albums and playlists. But do you have that same feeling when listening to the radio? Is playing random singles on the radio disrespectful to the original album order?
Bottom line is, you’re never going to even hear most of what you’ve got. The only way to keep tabs on a representative sample of the whole collection, to surface forgotten gems, to remind yourself of how your tastes have changed over time etc., is to use shuffle mode. Either that or spend all your waking hours immersed in the collection. And that ain’t gonna happen.
There is no disrespect in treating your collection like a personal radio station. And you can toggle between modes whenever you feel like it. A favorite workflow of mine is to listen on shuffle mode until something really grabs me, then to switch to album mode.
Don’t Fear the Ratings
For some, the thought of giving albums or tracks simplistic star ratings sounds facile – like reducing a student’s performance over the course of an entire semester down to a single letter grade. Fair point, but the thing is, ratings are super useful, and you should think of them more as markers than as value judgements.
As shown in the Smart Playlists section, you can create auto-generating playlists that immediately surface all of your most-dug tracks (which you can then use to make gift CDs or new playlists), or all of your worst (so you can go through and consider deleting the cruft later, or at least unmarking tracks or albums to prevent surprise playback).
Smart Playlists don’t mean jack if they’re not populated. To make this process easy, install Sizzling Keys. Then, when any track comes around that you have strong feelings about, just tap Ctrl-1 through Ctrl-5, without bringing iTunes to the front. The track will get its star rating silently, in the background.
Digitization Notes
Workflow
So you suddenly find yourself with hundreds (or thousands) of CDs to digitize. You want to make sure you’re getting the highest quality possible, you want to make sure you aren’t duplicating anything, and you want to make sure you have high-quality album art. Here’s the workflow that works for me:
– Deal with one box at a time. Don’t move on to the next before everything (de-duplication, cover art etc.) has been checked and double-checked. Keep things organized and compartmentalized.
– Check iTunes preferences and make sure you’ve selected Apple Lossless as the import format.
– To make it easy to see what you’re currently working on, create a “Recently Added” playlist.
– Search your collection for the disc currently on top of the stack. If you don’t have it, continue. If you do have it, is it a lower bitrate that should be upgraded? Then pay attention when you insert the disc. If the artist and album titles match perfectly, iTunes will offer to overwrite the existing tracks (keeping their cover art and play counts). Say yes to this offer. If they don’t match perfectly, you can either rename the old album and artist names and try again, or you can simply delete the old tracks after importing the new ones (which will cause you to lose the old play count and artwork).
– Put the encoded disc in a “To Check” pile.
– When the “To Check” pile has 20-30 discs, go to your Recently Added list and put it in Album view. Now you can see at a glance which albums did not get covers added automatically.
– Sometimes, it’s obvious that an imported album got a bad artist name or album title. Remember, if the artist and album titles match what’s in the iTunes store, you’ll get cover art automatically. Try renaming the album or artist, then right-click the album and choose “Download cover art.” Every now and then this will work, and you’ll get excellent cover art with no further effort.
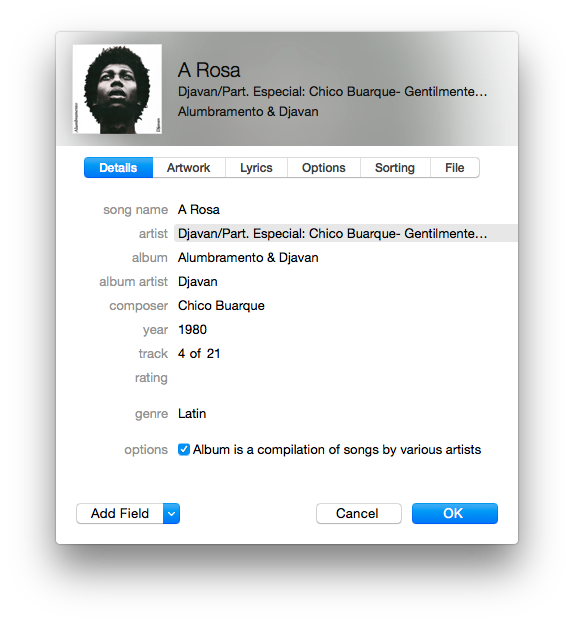
– If not, single-click the album icon and hit Cmd-I to “Get Info.”  Copy and paste from the artist and album fields and paste into  Google Images (see Adding High-Quality Cover Art for notes on adding album art from Google).
– If you can’t find good album art at Google, put the disc into a “To Scan” pile.
– When the box is done, scan everything in the Scan pile into iPhoto, then use iPhoto to straighten, crop, and color-balance each scan. Batch select the covers you want and export them as JPEGs at 1000px square with Medium quality. Â In the File Name field, select “Use Title” instead of the default “filename.” Â This will give you a folder full of cover art under 200k, which you can then manually apply to those albums.
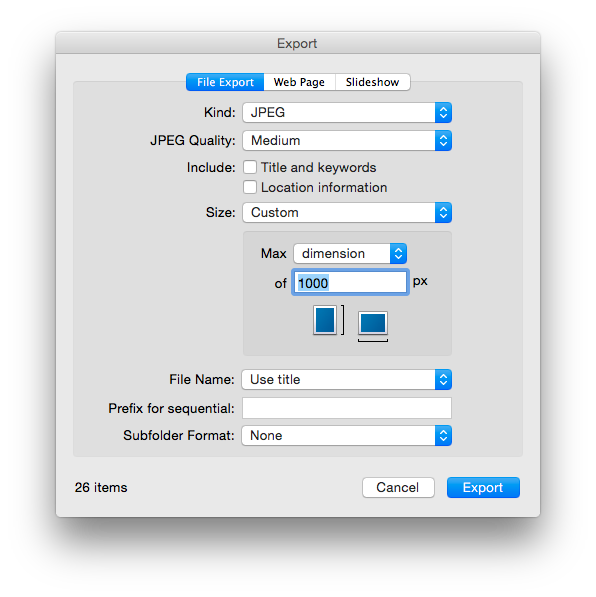
– Move on to the next box.
Need to digitize an LP collection? That’s a completely different process. See my separate Compleat Guide to Digitizing Your LP Collection.
Adding High-Quality Cover Art
One of the biggest drags of MP3/digital audio is the frequent loss of the glorious cover art experience. Don’t let this happen – learn to consider the default iTunes album icon as an enemy to be vanquished! Make a pact with yourself right now: No music will ever enter my collection without high-quality cover art to accompany it (my personal goal is to have art at least 1000px wide for every album).
If cover art isn’t added automatically by iTunes (which happens when it finds the same album in the iTunes Store), go to images.google.com and enter the artist and album title. Look for the highest resolution version of that album’s cover you can find, and select it. Then right-click to “Save Image…”
Tip: You can make Google Images return only results larger than a certain size. After entering a search term, click on Search Tools | Size | Large.
If the image you find is much larger than 1000px, you’ll be wasting disk space and bandwidth by embedding it – shoot for something under 200kb total. Fix large images by opening them in Preview and pulling down Tools | Adjust Size. Enter 1000px, then save. If the resulting file size is over 200k, pull down File Export and save out a version with higher JPEG compression.
If you can’t find the album on Google Images but have access to the original LP or CD, just photograph (LPs) or scan (CDs) the image into iPhoto. Then you can use iPhoto’s batch export option to output dozens or hundreds of optimized cover art images at once, to be embedded into track files.
Back in iTunes, select a set of tracks or an entire album and hit Cmd-I (Get Info). Select the “Artwork” tab in the info panel and drag in your optimized image file. Hit OK to embed the image into every selected track file.

Building a Music Server
There are dozens of ways to build a music server around iTunes. I don’t know whether there’s a “right” way to do it, but in general:
- You’ll need to store music on an external drive – no Mac ships with a hard drive large enough to house a very large collection (you can get a 4TB USB drive on Amazon for around $200).
- Scrolling through a large music collection – especially in album cover view – will consume quite a bit of RAM. Throw all the RAM you can afford in the machine, especially if the machine will be doing more than just serving music.
- The server should not be a machine that you or other family members will want to move or remove. It needs to stay put, always available (otherwise it’s not really a server, is it?)
- Make a pact with yourself never to digitize or download music onto any other computer in the house. Â You have one and only one canonical location for all of your music. Don’t create chaos for yourself.
Here’s my setup:
- Mac Mini in the office (which doubles as my main everyday workstation)
- Attached 4TB external hard drive
- AirPort Express attached via optical cable to stereo amp in living room across the house
Whatever you do, don’t be completely ridiculous.
Why Not Spotify?
So why go to all this trouble? Streaming services like Spotify, rdio, Rhapsody, Google Play etc. are great at what they do, with a few huge caveats:
1) Â It’s common now for streaming services to boast “millions” of tracks. But are they the tracks you want? Last time I did a back-of-napkin comparison, only about half of the tracks in my collection were also available on Spotify or rdio. Streaming services do have a lot of back-catalog, but they don’t have that 28-disc set of Sun Ra’s residency at the Detroit Jazz Center, or the entire Martin Denny discography, or those rare Beefheart bootlegs, or …
2) None of them offer music in lossless format (though some do offer high bitrate options). If you’re creating a library for the ages – a collection to last the rest of your lifetime (or be handed down to your kids), which could end up being played back on far better audio gear in the future than what you have now. Disk space is cheap. Bandwidth is cheap. Why settle? Go lossless – you won’t regret it.
3) Streaming services pull albums out of circulation on a regular basis. I’ve experienced several cases where albums I enjoyed one day simply weren’t available the next. That’s a risk you never take when you have and control the actual files.








Scot, I’m digitizing around 200 albums and have done around 52 so far using Vinyl Studio. Should I wait until all the album MP3’s are stored on my hard drive before moving them to an external? What about the raw WAV recordings produced by Vinyl Studio that the MP3’s are created from? Can you move those to an external drive as well?
Scott – That’s entirely up to you – now or later, your choice, doesn’t matter.
You don’t have to create WAV versions at all if you don’t want to. They’re nice to have so you have original source material you can go back to and generate a new format from (maybe you’ll later decide you want lossless FLAC rather than MP3?).
Have fun!