 Toilet installed last week and in use, tackled the sink today. Used a grout saw to remove a hex tile to make way for the pedestal’s lag-bolt. A bit of caulk to the base and it went into place neatly. Drilled bracing holes in new wall, test-mounted basin. Perfect level, looking good.
Installed most of plumbing into basin last weekend, thought it would be a simple matter to plop it on top of the pedestal, bolt it to the wall, and walk away. Spent most of the day wrestling with atrocious installation instructions. Sample sentence:
Unscrew the nut from the pop up body and take off the spring clip from the ball rod (please note: retain the white packing ring on the ball rod), and place the nut in the ball rod. Insert the ball rod into the side hole of drain, slide the nut on and tighten securely).
This might not sound unapproachable, except for the fact that there were three different parts that could accurately be called the “pop up body,” and that they used the word “in” wherever they mean “over” or “on.” In other places, the directions were completely muddled by attempting to cover six different fixture models in one set of text. “Let’s see… if I don’t have the white washer then I need to apply plumber’s putty between the black gasket and the porcelain. Wait, they must mean the other white washer. In that case…” And so on. All compounded by the impossibly cramped working quarters behind a pedestal sink – had to use a mirror to check my work, check for leaks, etc. Getting the drain lever assembly installed took 90 minutes alone. Finally got it all watertight and working. Not done yet, but the bathroom is actually usable again for the first time in two months! And looking great.
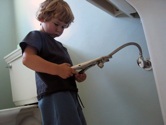
Miles was a great help, too. Pictured: learning all about vice grips, then turning them on me — “Bite! Bite! Cheetah chomps!”
Next up: Install shower/bath fixtures, locate source for ball-bearing cabinet rails, build sliding drawers, install lighting (assuming it ever arrives).
