
For a while now, I’ve been wanting to try my hand at geocoding — attaching latitude and longitude (coordinate) data directly to the EXIF metadata in photographs so they can be precisely positioned on a map.
The easiest way to do this is to use a camera with a built-in GPS. Unfortunately, that’s still a pretty rare feature in cameras, and comes at a hefty premium. Because most people aren’t interested in the feature and never will be, it’s not likely to become commonplace any time soon. Some day we’ll all have high-quality cell phone cameras with native GPS — the Nokia N95 is the current front-runner, and I think it’s a safe bet the coming Google phone will have fully integrated GPS features. I’ve been holding back on taking the iPhone plunge until it has fully realized GPS capabilities (at which point it will also become the ultimate geocaching device).
But the cool thing is, you don’t have to wait for a GPS-enabled camera to start geocoding. Here are the results of my first geocoding experiment, created without a GPS-enabled camera. The icons are clickable; the thumbnails in the balloons are too.
The photos aren’t great, the interface isn’t perfect, and due to several beginner’s mistakes, only some of the coordinates shown here are accurate. This was more a proof of concept than anything – a way to explore available software and techniques. You’d think generating a map like this would be trivial at this point in the game. Well… yes and no. There are a ton of options, but getting things to appear exactly the way you want them to is still a bit of a pain. Click through for the gory details.
I recently picked up an excellent (paper) map detailing 140 of Berkeley’s hidden pathways – concrete or wooden stairs covering the steep stretches between many of the twisting, heavily wooded streets of Berkeley. These were mostly built at the turn of the last century to help citizens without cars get to the local train systems. I recently explored a few dozen of the paths with my family, and started my geocoding experiment there.
Geocoding on the Cheap
There are two ways to start geocoding without a GPS-enabled camera:
1) Use any hand-held external GPS to store track data. Just turn it on, strap it to your hip, and start shooting. Assuming that your GPS’ internal clock and your camera’s internal clock are synchronized, you can later merge timestamps from your GPX tracks and your images to determine with fairly tight precision where on earth each image was shot. Hidden advantage to this method: If you carry multiple cameras, or have multiple photographers working in close proximity, one GPS device can service multiple cameras simultaneously. The images above are the combined output of my camera’s and my father’s.
OR:
2) Manually drag photos onto a digital map to set their coordinates. This is a simple, low-tech method with a huge problem: It relies entirely on your feeble human memory. If you shot a lot of images in unfamiliar surroundings, if the subject matter is at all ambiguous, or if a lot of time has passed since you originally shot the images, you’ll have a really hard time nailing the right point on the map, and will often be reduced to guess-work. This method is definitely unsuitable for journalistic applications, and is probably too vague for most users in most situations.
My experiment focused on method #1. The technique requires some kind of software to analyze both your images and your track files, find corresponding timestamps, and write coordinates from the track files into the EXIF headers of the image. There are a few good options for accomplishing this on the Mac. I first tried GPSPhotoLinker — an excellent piece of donation-ware created by grad student Jeffrey Early. GPSPhotoLinker did a great job of merging track data with images and writing out the new EXIF data in either manual or batch modes. The images it exports are fine for use in GPS-aware photo apps (such as Flickr), but I was looking for something more – I wanted my images placed on the map, not just made map-ready.
By the way, the Preview application in Mac OS X Leopard does a cool thing when it encounters GPS coordinates in EXIF. Hit Cmd-I when viewing an image and you get this:
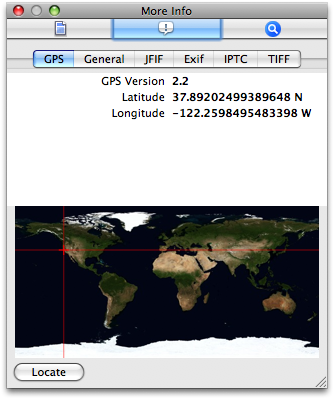
Clicking the Locate button takes you to the exact spot on earth where the picture was taken in Google Maps.
Flickr Maps
Next stop, Flickr. I posted back in May about how Yahoo! had merged their own Yahoo! maps with Flickr to let users drag images onto a map to geocode them. Cool tool, but see above for the problem with that – too fallible, too manual. What I didn’t realize then was that Flickr will also utilize coordinate data in EXIF headers if it encounters them. But after uploading a geocoded image to Flickr, it was not automatically mapped. Turns out this is a feature, not a bug. When you think about it, it makes sense – you wouldn’t want every image you upload to Flickr to be placed on a map automatically – the privacy implications are huge. But if you go to your account settings in Flickr, select the Privacy tab, and enable the option to “Import EXIF location data,” you’ll find that geocoded images you upload to Flickr are automatically mapped. Here’s one, for example (click the “Taken in… map” link on that page).
So isn’t this the best of all worlds? With Flickr you have the choice of geocoding either by dragging onto a map or by uploading geocoded images. You get to use their free storage and excellent UI, their tagging system, etc. Almost. Problem is, there’s no way (that I can see) to pre-zoom a Flickr map exactly to where you want it. There’s no way to exclude your previously geocoded images from the view. There’s no way grab a custom URL for just one mapped image or image set. And there’s no way to embed a small version of your photo map for use in a news story or blog entry. So Flickr excels in some ways, then falls totally flat when it comes to the end product. It might be possible to get around these limitations via the Flickr API; I haven’t gone there yet.
Google maps suffers none of these problems. On the other hand, it’s totally non-obvious how to get your photos overlayed on a Google map (n.b.: I haven’t yet flirted with Picasa, which is the Google desktop photo tool, since it’s currently available for Windows only).
OK, so what I wanted was desktop software for the Mac that would let me geocode my images with data from external .gpx track files, then generate a web-embeddable Google map.
KML vs. KMZ
Let’s get some essential Google Maps concepts out of the way — tidbits I learned in the process of this experiment.
KML: You can overlay just about any kind of external data onto Google Maps or Google Earth by creating an XML file defining coordinate sets and pretty much any other kind of metadata. The XML file needs to be formatted according to the Google Maps API. This file is called a KML file – a well-formed textual “database” referencing your photos or other data living on an external web server.
KMZ: A KMZ file is really a .zip file, which consists of a folder containing a KML file plus additional data such as folders full of images. Rename a .kmz file with the .zip extension and double-click to unpack it so you can dig through its components.
Limitations: Google Maps and Google Earth are kissin’ cousins. Both can read both KML and KMZ files, though they handle them a little differently. While Google Maps chokes when you feed it a KMZ file weighing more than 1MB, Google Earth does not. Because not everyone has the ability to publish images to web servers, understand relative paths, etc., it’s much easier for the general public wanting to publish geocoded images to use KMZ files. However, the recipient must have Google Earth installed on their computer. Not acceptable for me – for embedding complex photo maps on blogs and in news stories, images will have to be published to a web server first, and referenced from a straight KML file.
Embedding: Take a look at the “Search Maps” field at the top of maps.google.com. While 99% of us use this field to search for street addresses, you can actually enter the full URL to a KML or KMZ file living on an external server into that field. If the URL is valid and the file is anatomically correct, Google Maps will parse and display what it finds at that URL rather than its own data. That capability is the key to hacking Google Maps, and everything that follows.
Scripting a Solution
Lazy sod that I am, I wanted to avoid reading APIs and scripting up a solution from scratch. I wanted to find software that would give me the perfect map. Then I discovered HoudaGeo. At first it seemed like the perfect solution – it does everything, soup to nuts, and includes a nice wizard-like interface to step you through the process. I loved that it also let me set titles and captions which ended up being included on the generated map. But then I hit a snag: While HoudaGeo claims to output KML, it actually outputs KMZ only. Which meant I was saddled with the limitations above. Also, I wasn’t happy with the formatting of the generated map – I wanted thumbnails in the balloons to click through to full-size versions, among other things.
I corresponded with the author of HoudaGeo, who promised to add KML output to a future version, but I needed a solution now, and I wanted more formatting control. Which pretty much meant getting my hands dirty (which is OK by me, but I’m also looking for a solution to recommend to journalists, and the command line isn’t it :).
The excellent command-line EXIF Tool is capable of reading and writing any kind of EXIF data. Seemed like a good place to start. After playing with it for a bit, found this in the forums: Generating a Google Earth KML file. Bingo! A simple recipe for spitting out KMLs from a directory full of geocoded images, and utilizing fully customizable templates. Paydirt. Wrapped up the steps there into a simple shell script, and the result is what you see above.
Unfortunately, the command-line approach is a double-edged sword. While it got me around the KMZ-only problem, I also lost one of the big advantages of using a GUI – the ability to enter titles and captions for photos while looking at them. I ended up having to enter titles and captions into the generated KML file manually (I could add a bit of interactivity to my script to prompt for these, but still wouldn’t be able to display images from the command line while captioning them, so it would still require toggling back and forth from the command line to an image viewer).
I know the perfect solution has to be out there, probably right under my nose. Maybe the next version of HoudaGeo will be the ticket, maybe something else.
Beginner’s Mistakes
1) The example above is actually the output from two separate hikes. I forgot to sync the clocks in the GPSr and the camera before setting out the first time, only remembering to do so before the second. As a result, some of my images had one time offset and others had another. I gave up trying to do the appropriate time compensations for the two shoots. As a result, I can’t vouch for the accuracy of image placement in the example. Get this right before starting.
2) Every time you turn a GPS device on and off, it will start a new track. But when you download tracks from a GPS device, you’ll get them all as one big track file. Either use the “clear tracks” option in your GPS before starting, or edit your track file down to just what you need before loading it into HoudaGeo or other software – otherwise extraneous track data will appear in Google Maps (the author of HoudaGeo says that only corresponding track data should appear in the output, but that’s not what I found). Using EXIF Tool plus shell script to generate KML files gets around this problem entirely, but with a downside: No tracks are displayed on the generated map at all – only the image locations. I’d like to display the track overlayed with the images.
There are a million ways to skin this cat. What are you using for geocoding?
Geat review and instructions. Didint know Leopard did the GPS in preview either!
I purchased Geohoudah and love it..
Thanks
Scott I’m running into the same trouble as you are – I love the Flickr functionality but some maps are just too inexistent (like for instance Iceland).
You can also use maps.yuan.cc to place your pictures using Google and a few other maps on Flickr, it’s a nice tool when the Yahoo! provided map is too poor.
My main issue with your solution #1 is that I am unable to choose the hand held GPS , would you have any recommendations ?
Hey Ludovic – Thanks for the tip on maps.yuan.cc – Looks like a powerful service (though I’m not sure I’d want to entrust my geo maps to a single guy’s DSL connection and home computer!)
I’ve never used any GPSr but my own, so I’m a bad person to ask advice from – I’d ask around in the geocaching.com forums . I’m mostly happy with my Garmin Vista Cx, except it’s a bit small and the buttons are too hard to press. Got a good deal on it though. Just got a glimpse tonight of their new Colorado device, which looks gorgeous and super useful, but costs more than an iPhone :)
p.s. One of the things I really like about the Colorado is its built in support for paperless geocaching – right now I have to load all the descriptions and logs into my iPod to go paperless because the Vista only loads the waypoints, not the descriptions. Would *love* to boil it all down into a single device like this.
Hi!
HoudahSpot 1.4 now offers you a choice between KML and KMZ. While KMZ is recommended for most users, advanced users may want to output KML for use with Google Maps, Google MyMaps or Google Maps API.
Best,
Pierre Bernard
Houdah Software s.Ã r.l.
Pierre – I’m assuming you mean above HoudaGeo, not HoudaSpot, right?